How to Update Xiegu G90 Firmware? | 2024 Latest Guidance
- Ham Talk
-
 Posted by Jackson Chen
- Leave a comment
This is the latest Xiegu G90 firmware update guidance for you all. With every new firmware releasing, more and more new features are available.
The following items are needed:
A. USB-to-Serial cable
B. G90
C. A computer running the Windows (XP/Vista/7/8/10/11) operating system
D. A 12-15V DC power supply (capable of supplying not less than 5A)
1. Install USB-to-Serial cable:
The very first thing is to make
sure that the USB-to-Serial cable is working properly with the personal
computer. The first time the cable is plugged into a USB port on the computer,
the operating system will search for a driver file for this new hardware and
automatically install the driver program. If all has gone well, we will be able
to see the virtual serial port in the device manager program. If the driver file
can’t be automatically installed by the operating system we will need to install
it manually (driver files are available from the Radioddity
G90
support page).
(Note: very early Xiegu USB-to-Serial cables used
the Prolific Chip, currently supplied cables use a chip from FTDI, the old
cables tended to be black in colour, the newer ones blue.)
After this action the virtual serial port and its port number will be visible in Windows Device Manager
(which on the below computer you will see is COM6).

2. Wiring everything up:
2.1 Connect power cable

2.2 For updating the firmware in the head unit:

2.3 For updating the firmware in the base unit:

3. Update firmware via TeraTerm terminal software
(The
program is supplied in firmware zip file from
Radioddity if you don't already have it installed):
In order to transfer the firmware to the device, we use a serial terminal software program with XModem support called TeraTerm
(other programs can also be used but this guide is for TeraTerm).
3.1 Install the TeraTerm terminal software
However, we are finding that some of the more aggressive Web Protection/Virus/Malware applications may be stripping the update and firmware files from the downloaded archive, or when the archive is extracted. The following link will allow you to download a certified virus-free Tera Term application used for the G90 update process.
RE: teraterm-4.105 https://tera-term.en.lo4d.com/windows

On any executable application, Right-Clicking on the app will open a selection box in which Run as Administrator is an option. Selecting Run as Administrator will ask for your permission to let the app make changes to your computer - Click YES
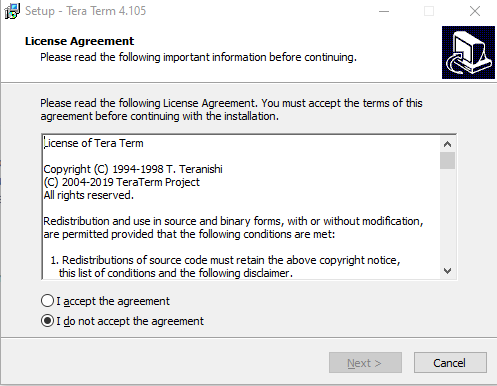
You will next see this:

Click on the I accept the agreement option and click Next

You will be given the option to accept the default installation location or Browse for a new one:

Click Next
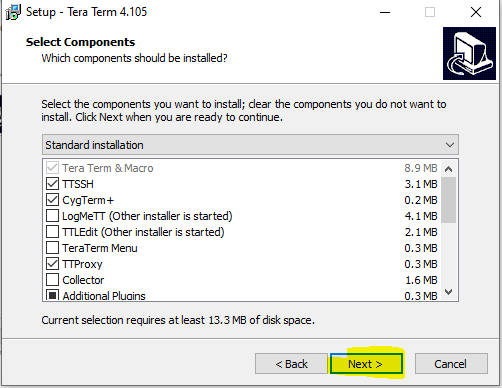
Accept the defaults and click Next

Select Language and click Next

Select default or Browse for Start Menu Folder and click Next

Select additional tasks/options and click Next

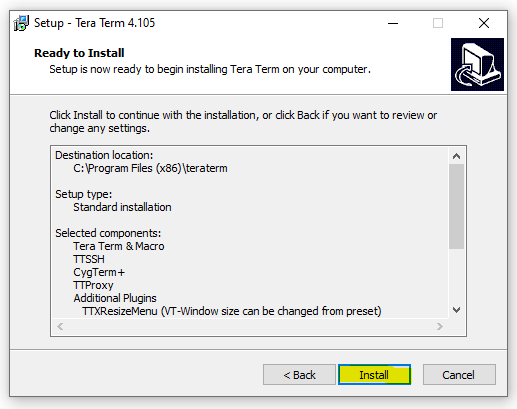
Confirm installation options and click Install

Select Launch Tera Term and click Finish

3.2 Confirm your COM Port
Open Device Manager, Click on Ports (COM & LPT)
Observe Port number -- Right-click on the USB Serial Port (COMx) --x is the Com Port Number.
Select Properties, then Port Settings. Confirm Bits per seconds is 115200. Click OK

3.3 Configuration of TeraTerm
a) Select the serial port:
From the upper bar, select File/New Connection and then when the panel
opens, the serial radio button.
This is where we enter the com port (COM5 in the below case, yours could be
different) which we saw in Device manager earlier – select it from the list of
available ports from the drop-down list.

b) Now we set the communications baud rate: Select Setup/Serial port.

Confirm the Speed is 115200 Click New Setting

c) We are now presented with the main terminal window:

d) Now ith G90 connected to a 13.8 Volt DC Power source
capable of at least 6 amps current capacity, we start the G90 and want to enter
the maintenance menu:
If updating from an early version of
firmware to the current version press the space bar within the first 10
seconds of the start-up. If a normal boot occurs try again with the space bar on
the computer held down and with the terminal program “having focus” i.e.
selected.
If updating from a recent version of
firmware press the volume button on the radio as you turn the radio on.
Again, if this fails, try the process holding the space bar down and powering
the G90 on.
Both of these actions interrupt the normal booting procedure and present you
with a menu as shown below.
Why?
HOLD SPACEBAR DOWN and press G90 Power Button
(for G90 radios with Serial Numbers not containing the letter V as the prefix)
Press Volume Knob and power-on the Display Unit
(for G90 radios with Serial Numbers containing the letter V as the prefix (ONLY those containing a V as the first character of the Serial Number)
e) The firmware update menu will appear:
(When updating the main unit, there is a count-down timeout during which
time you need to press 1 – when updating the display unit, there is no timeout,
it waits for you).

Step 1: Press 1. Update FW
Step2: “Erasing.. 100%” and “Wait FW file...” will be displayed – the old
firmware in the radio has now been erased and the menu is waiting for you to
supply the new firmware code.

When the old firmware is erased and the message displayed is Wait FW File,

f) In Tera Term Click File → Transfer → XMODEM → Send In that order

Select Main Unit firmware update file (download the latest firmware of Xiegu G90), click Open

Check the 1K Option Box The transfer will not work if you do not do this!
g) The transfer will start loading

h) Wait until the transfer finishes

Once the transfer has successfully completed the G90 will restart automatically.
i) If you need to update both parts of the radio (head and main units)
Remove power count to 5 and reconnect power
Remove the plug from the rear and insert in the lower left-hand socket on the Display Head
If updating from an
early version of firmware to the current version press the space bar
within the first 10 seconds of the start-up. If a normal boot occurs try again
with the space bar on the computer held down and with the terminal program
“having focus” i.e. selected.
If updating from a recent version of
firmware press the volume button on the radio as you turn the radio on.
Again, if this fails, try the process holding the space bar down and powering
the G90 on.
Both of these actions interrupt the normal booting procedure and present you
with a menu as shown below.
Select 1 Update FW
When the TeraTerm displays Wait FW File
In this order, select
File
–
Transfer
–
XMODEM
–
Send

Select Display Firmware file
Place a Check mark in the 1K Box

Click Open
Loading……

Loading……

IGNORE THE LOST COMM Message if it appears
On Completion, remove power from the G90 and count to 5
Re-Connect power to the G90. turn radio on.
j) After restarting the radio, hold Function button in for 2 seconds, check the
firmware levels through option 10 in the system menu.

Done!


14 Kommentare
Jim / SV8ANW
I have XIEGU G90. I have found that you can enter the firmware upload mode with the Tera-Term software by pressing the “space” key on the PC’s keyboard while you are in the Tera-Term window and powering up the transceiver from the 12 volt Power Supply you use for the radio. That works even if you have accidentally erased the firmware software in the main unit and the display unit and the G90 is completely “dead” !!!
Maury
It should be noted that the firmware upgrade package for 1.80 only has firmware for the display unit and not the main unit. This is problematic if you go to update the main unit and the firmware first gets erased from the unit, but then you don’t have a firmware file for it.
Bob
First let me say thanks to Radioddity for their support to the owners of the G90. We all appreciate the efforts I am sure. Secondly a down thumb to Xiegu for making these firmware upgrades so darn convoluted. We have all installed way too many programs over the years to know that their are much better ways to AUTO install many if not most programs and this is not one of them. Hell the instruction set is so volumous that you need to take a brake in the middle of reading them all. Not satisfactory in this day and age of modern computing. Again thanks to Radioddity for making the info and the files available and also Xiegu for continueing to support the G90 with the upgrades. But please tell your programmers and documentation people to get their act together and write simpler loaders for the upgrades.
George Cullen
What a test of will, endurance and attention to very fine details.
This is an overly and unnecessarily convoluted process.
The Xiegu people “could and should” spend a few hours to develop
a user-friendly process and execution.
bILL
I suppose the first time updating is a little challenging, but having done it a few times, it is a pretty straightforward process now. I will say that I have scratched my head for several hours after appearing to brick my radio, only to discover that I neglected to check the box showing “1K” in the Teraterm file transfer window. It absolutely will give you issues if you forget that step.
Otherwise I can update, downgrade or do whatever to both the display unit and the base without any problems now. The folks at RADIODDITY (thank you you all for your support and assistance) have been fantastic and they will be my goto source for any equipment that I would like that they carry. Special shout out to Echo for the quick follow ups and taking excellent care of me.